

Introduction
PayQin Business API allows you to implement the PayQin Payment method in your website and thus receive payments from your customers. With PayQin Business API you can create a transaction between customers and you (the merchant); and the customers will complete the transaction by going through the payment process.
This Documentation is divided into two sections: the first will help you understand merchant feature and guide you through how to configure your merchant account properly from the PayQin App; and the second will describe how to create a transaction using PayQin Business API.
Understanding the Merchant features in PayQin App
Main Screen
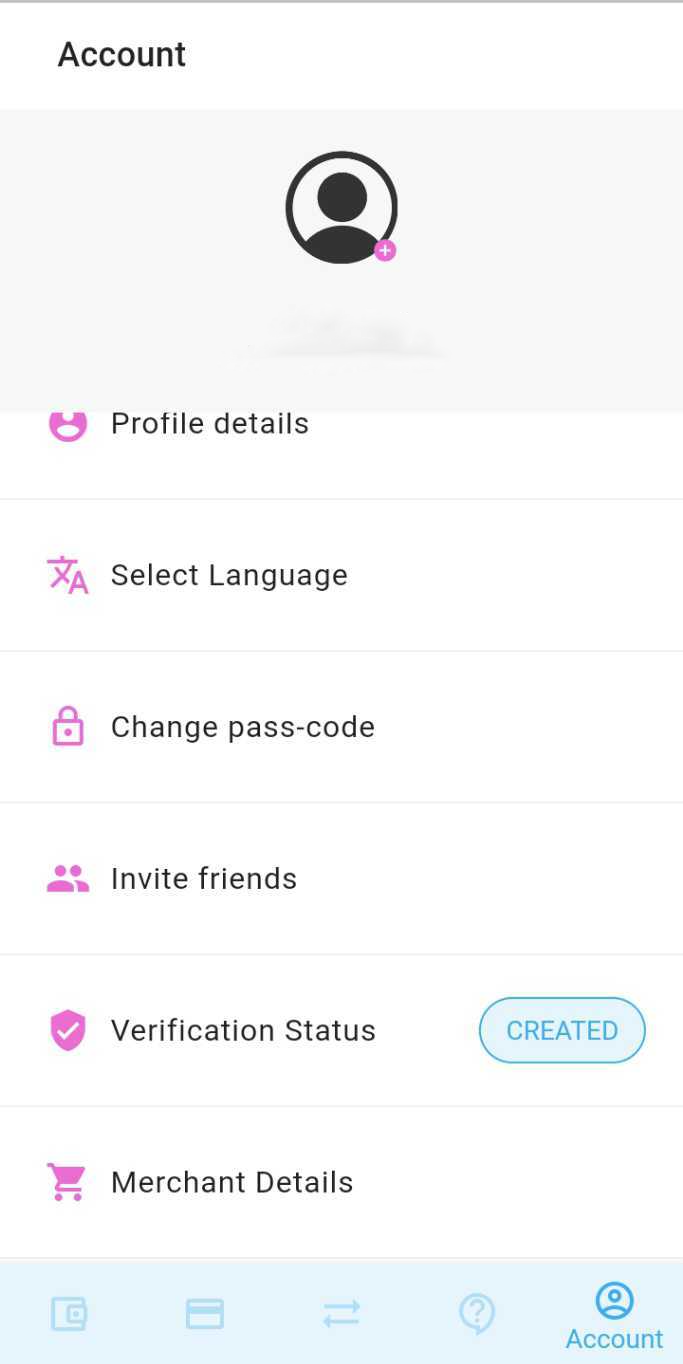
Configuration of the merchant feature is accessible from "Merchant Details" option in your "Account Screen" as shown in the screenshot below:
After you tap on "Merchant Details" option from the "Account screen", you will be presented with the following screen:
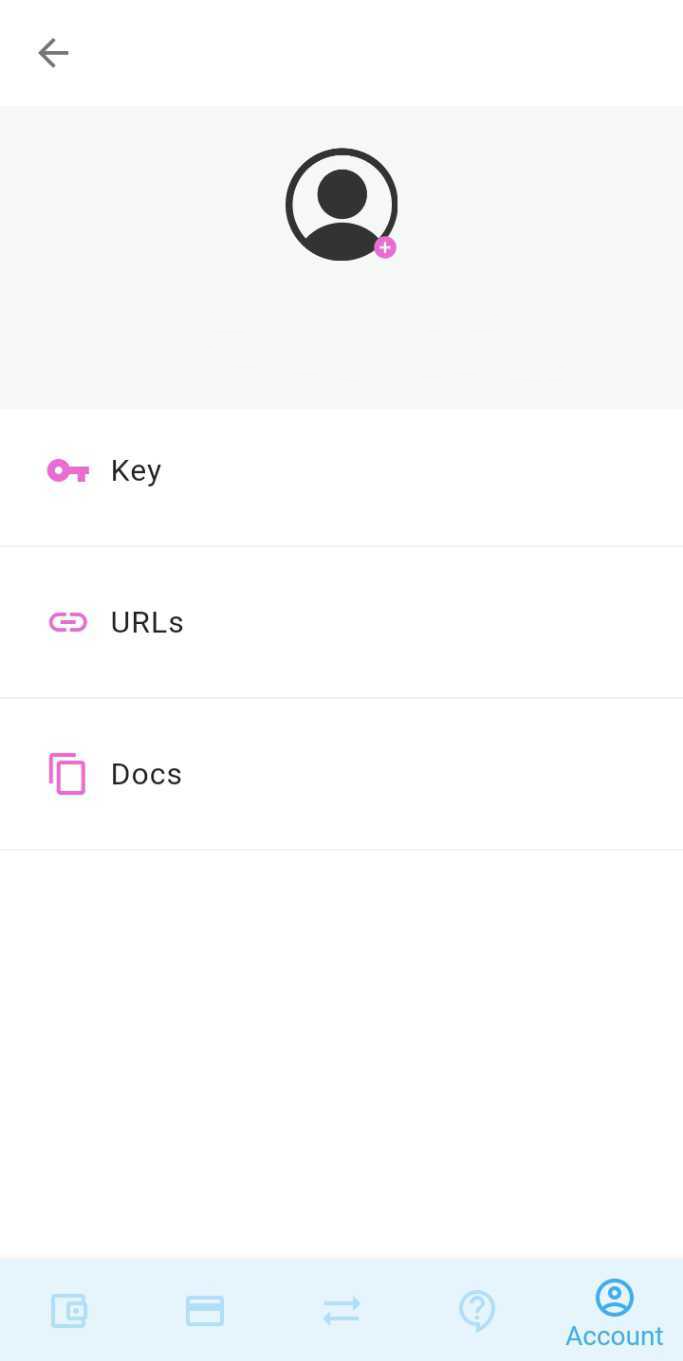
The option 'ID & Key' is to access the Merchant's Shop ID and Secret Key that would be used to verify that the created transactions originate from your end.
The option URLs is to change URL configuration for your Merchant Account. Go the the URL section below for more information.
The option Docs is to access this documentation that you are currently viewing.
ID & Key Screen
Here, you can access the shop ID and secret key for your Merchant Account, which would be necessary to sign the transactions. The signature used during signing uses this shop id and secret key. The signing verifies that the transactions sent to PayQin server originate from your end. See [How to create a transaction?] section for more information.
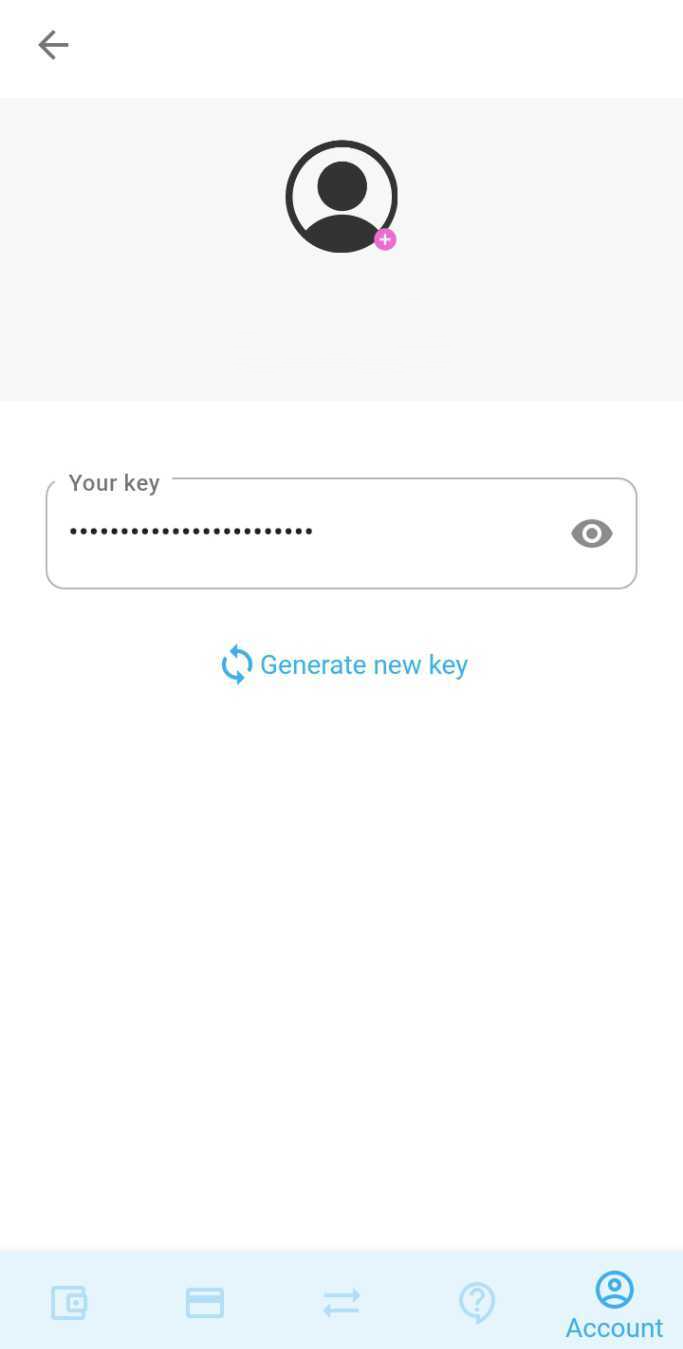
In the secret key, tap on the eye icon to reveal the secret key (which is obscured by default). You can also generate a new key by clicking on the "Generate new key" button. You might need to generate a new key when you think that your key has been revealed to someone and thus compromised.
URLs
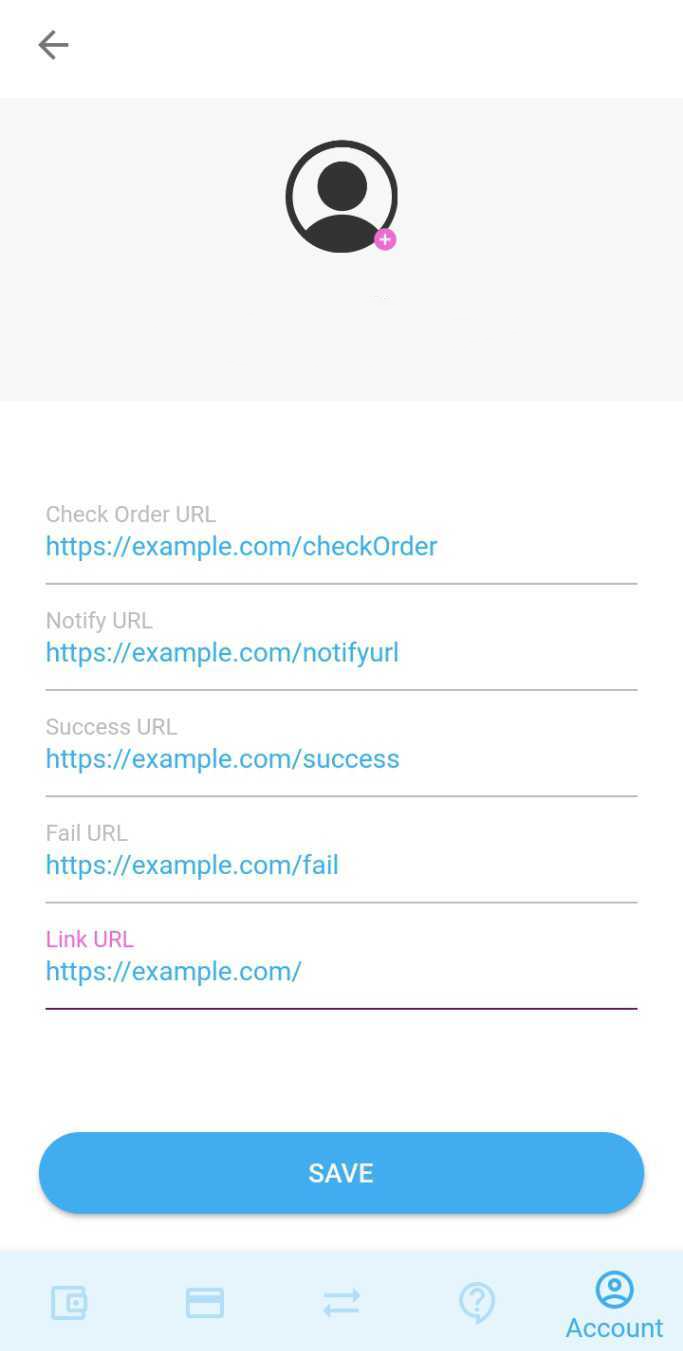
The URLs screen allows you to change the URL configuration for your PayQin Merchant Account. It contains the URLs that PayQin Server will contact during several stages of the PayQin Payment Process.
Check Order URL: PayQin server calls this URL to check if the details about the transaction is correct or not.
[ TODO: Write how Check Order URL feature POSTs information ]Notify URL: PayQin server sends notification to this URL about the change of state of Payment process.
[ TODO: Write how Notify URL feature POSTs information ]Success URL: PayQin server redirects the user to this URL when payment completes successfully.
Fail URL: PayQin server redirects the user to this URL when payment fails to complete.
Link URL: The link that uniquely identifies the Merchant's Website.s
How to create a transaction?
A transaction should be created first by making a POST request with necessary information to /api/transactions. Then, users can be redirected to the url provided where the users complete the payment process.
Request
Method: POST
Base Url: `https://business-api-2.ew.r.appspot.com`
Endpoint: /api/transactions
Headers:
Accept: application/json

Body:
{
   "shopId": "5e8b48961b191f0017ad43f8",
   "amount": 1000,
   "customerNumber": "1234",
   "orderNumber": "123456",
   "signature": "5E311DAD75AD7F68E732E4CBA01461D9"
}
Request Description
shopId: [UUID] Your shop ID as registered with PayQin
amount: [Number] The amount that the customer should pay
customerNumber: [String] A customer ID with which you can identify the customer
orderNumber: [String] A order ID with which you can identify the order
Signature: [MD5 Hash] MD5 Hash with which PayQin server knows that the transaction was initiated from you. See [How to create a signature]section for more details. Note that Signature should be in ALL CAPS.
Response
{
   "transaction": {
       "id": "5f61a1102c68efa6b68daa2d",
       "merchant": "5f158570b13b18aebc8ffc77",
       "currency": "XOF",
       "amount": 1000,
       "status": "open",
       "orderNumber": "123456",
       "customerNumber": "1234",
       "signature": "5E311DAD75AD7F68E732E4CBA01461D9",
       "createdAt": "2020-09-16T05:22:24.196Z",
       "feeAmount": null,
       "feeAmountMerchant": 0
   },
   "url": "https://get-payqin.ew.r.appspot.com/api/business/transaction/view/5f61a1102c68efa6b68daa2d",
   "success": true
}
Response Description
The most important property and the only one that you will every likely need is the url property. Just redirect the paying customers to this link to have them complete the payment process through our website.
transaction: [Object] Information about the transaction just created.
id: [UUID] UUID of the transaction
merchant: [UUID] Merchant UUID
currency: [String] Currency in which the transaction will be processed. It is the same currency in which the merchant has his account.
amount: [Number] Amount of the transaction
status: [String] Current status of the transaction. Available statuses: open, pending, completed and failed
orderNumber: [String] The order number provided in the Request body
customerNumber: [String] The customer number provided in the Request body
signature: [MD5 Hash] The signature provided in the Request body
createdAt: [Date] The Date & Time at which the transaction was created
feeAmount: [Number] Not necessary
feeAmountMerchant: [Number] Not necessary
url: [String] The url at which paying customers can complete the payment process for this transaction
success: [Boolean] Whether the POST request succeeded or not
How to sign your transaction? [How to generate a signature?]
This section describes in more detail how to create a signature that is used authenticate and authorize the creation of a transaction. To generate you just need the following things: shopId: Id under which your account is registered as a Merchant amount: The amount of the transaction secretKey: The secret key associated with your Merchant Account. You can obtain this either through the PayQin App or see the [Get Merchant Information] or see the [Generate new secret key] section below. After you have these three things, put them in a single string separated by semi-colons ("shopId;amount;secretKey"), and create a MD5 hash of this string. The resulting string when uppercased will be the signature that you need for your transaction.
For example: Let us suppose the values for each would be: shopId: 5e8b48961b191f0017ad43f8 amount: 1000 secretKey: BMXlyAyEnm96Hh3E0UDjK0Xy
Then the combined string separated by semi-colons would be: 5e8b48961b191f0017ad43f8;1000;BMXlyAyEnm96Hh3E0UDjK0Xy
The MD5 hash of this string would be: 8F69F1A1E8EC2FFA705260150148ABEA
which is the required signature of our transaction.
Pay your customers
This section allows you to transfer money from your PayQin merchant account to the PayQin customer account of your user.
You don't need to enter the currency. The currency of your merchant account is automatically used for the transaction
Request Description
shopId: [String] Your PayQin merchant ShopId
amount: [Number] Amount of the transaction
secretKey: [String] Your PayQin merchant secret key
customerPhoneNumber: [String] The number of the user you want to transfer money to
Request
Method: POST
Base Url: `https://business-api-2.ew.r.appspot.com`
Endpoint: /api/transactions/merchant
Headers:
Accept: application/json

Body:
{
"shopId":"5f5d1574d2f3ce0012fceedf",
"amount": 1000,
"secretKey": "F3Kkk2vCilSJzHgTSAFw7960",
"customerPhoneNumber": "+2250556203448"
}
Response Description
success: [Boolean] Whether the POST request succeeded or not
transaction: [Object] Information about the transaction just created.
message: [String]
Response
{
  "success": true,
  "transaction": {
    "id": "6023c82c44b3d148d08af4d2",
    "merchant": "5f84472a1314721a7b3f8bc2",
    "currency": "XOF",
    "amount": 1000,
    "status": "completed",
    "orderNumber": null,
    "customerNumber": null,
    "signature": null,
    "createdAt": "2021-02-10T11:49:00.757Z",
    "feeAmount": null,
    "feeAmountMerchant": 0
  },
  "message": "You have just transferred XOF 1000 to the +2250556203448"
}
Get Transaction
Get the details of a transaction
Request description
id: [String] The transaction ID
Request
Method: GET
Base Url: `https://business-api-2.ew.r.appspot.com`
Endpoint: /api/transactions/:id
Headers:
Accept: application/json
Response Description
success: [Boolean] Whether the request succeeded or not
transaction: [Object] Informations about the transaction
Response
{
   "transaction": {
    "id": "604b884fe821dc00198f1cc6",
    "merchant": {
      "fee": 0,
      "link": "https://stocklet.ci/",
      "notifyUrl": null,
      "successUrl": "https://stocklet.ci/checkout-success",
      "failUrl": "https://stocklet.ci/checkout-failed",
      "checkOrderUrl": null,
      "secretKey": "WT6P9AAbuM5DlAPYCC6swPSS",
      "_id": "602bdc573ac4a0001230d0be",
      "payqinId": "602bd79a115c0100126cd9a9",
      "currency": "XOF",
      "createdAt": "2021-02-16T14:53:11.877Z",
      "updatedAt": "2021-02-22T11:53:11.208Z",
      "__v": 0
    },
    "currency": "XOF",
    "amount": 13500,
    "status": "open",
    "orderNumber": "FD13C62F4995153D2",
    "customerNumber": "124",
    "signature": "D32FFDAEBB0E6CDAEA6D5514D9745120",
    "createdAt": "2021-03-12T15:27:11.765Z",
    "feeAmount": null,
    "feeAmountMerchant": 0
  },
  "success": true
}
Check Transaction
Check the details of a transaction
Request description
id: [String] The transaction ID
Request
Method: GET
Base Url: `https://business-api-2.ew.r.appspot.com`
Endpoint: /api/transactions/:id/check
Headers:
Accept: application/json
Response Description
success: [Boolean] Whether the request succeeded or not
transaction: [Object] Informations about the transaction
Response
{
  "transaction": {
    "id": "604b884fe821dc00198f1cc6",
    "merchant": {
      "fee": 0,
      "link": "https://stocklet.ci/",
      "notifyUrl": null,
      "successUrl": "https://stocklet.ci/checkout-success",
      "failUrl": "https://stocklet.ci/checkout-failed",
      "checkOrderUrl": null,
      "secretKey": "WT6P9AAbuM5DlAPYCC6swPSS",
      "_id": "602bdc573ac4a0001230d0be",
      "payqinId": "602bd79a115c0100126cd9a9",
      "currency": "XOF",
      "createdAt": "2021-02-16T14:53:11.877Z",
      "updatedAt": "2021-02-22T11:53:11.208Z",
      "__v": 0
    },
    "currency": "XOF",
    "amount": 13500,
    "status": "open",
    "orderNumber": "FD13C62F4995153D2",
    "customerNumber": "124",
    "signature": "D32FFDAEBB0E6CDAEA6D5514D9745120",
    "createdAt": "2021-03-12T15:27:11.765Z",
    "feeAmount": null,
    "feeAmountMerchant": 0
  },
  "message": "Merchant hasn't checkOrderUrl",
  "success": true
}
Configure notifications
This section allows you to configure notifications. At the end of your transaction PayQin will send a notification on your url with a number of parameters
Request description
The parameters that are described here will be sent to your notification url at the end of the transaction
action: [String] The transaction action
id: [String] The transaction ID
orderNumber: [String] The order number provided in the Request body
customerNumber: [String] The customer number provided in the Request body
currencyCode: [String] The currency code of the transaction
shopAmount: [String] The amount of the transaction
status: [String] The status of the transaction
endDate: [String] The date the transaction ended
signature: [String] A uniqiue signature generated by the PayQin system
requestDate: [String] The date the transaction was initiated
Request
Method: POST
Base Url: `your notification url`
Endpoint: `your notification endpoint`
Headers:
Accept: application/json

Body:
{
  "action": "notification",
  "id" : "5f61a1102c68efa6b68daa2d",
  "orderNumber": "1234",
  "customerNumber": "123456",
  "currencyCode": "XOF",
  "shopAmount": 1000,
  "status": "completed",
  "endDate": "2021-02-10T11:49:00.757Z",
  "signature": "65DF0141F383615B7EDBC7D1A722B8CE",
  "requestDate": "2021-02-10T11:49:00.757Z"
}